


When the cloud was just about virtual machines, tools like Chef or Puppet helped us easily prepare our VMs. The only thing that mattered was to provision instances that contained all of the code and data required. But now that Amazon Web Services has ballooned to more than 90 services, interacting with the AWS API becomes the major part of the work.
How should we manage AWS infrastructure, and what interfaces should we use? Most beginners start with AWS Console, the default GUI, while seasoned sysadmins generally prefer a command-line interface (CLI). Problem is, the AWS CLI is not user friendly. Because it integrates the entire AWS API, it exposes an enormous surface area in terms of commands, flags, and options.
Awless is born from our need for a fast, powerful, and easy-to-use CLI to manage AWS. With Awless, you can create and run an AWS infrastructure, starting from scratch, and always get readable output (for both humans and programs), explore and query all cloud resources (even offline), connect to instances, and create, update, and delete cloud resources. Beyond single command lines, Awless supports templates that enable higher levels of automation. Last, but not least, Awless aims to ensure smart defaults and security best practices.
Because there are so many AWS services, it is often important to find and display a hierarchy of services from the command line. We can group services by functionality—such as compute and database. But going through each of them exhaustively is tedious as there are, as of this writing, no fewer than 15 services around storage and database, not counting four data migration services and nine analytics services that are directly related to data usage.
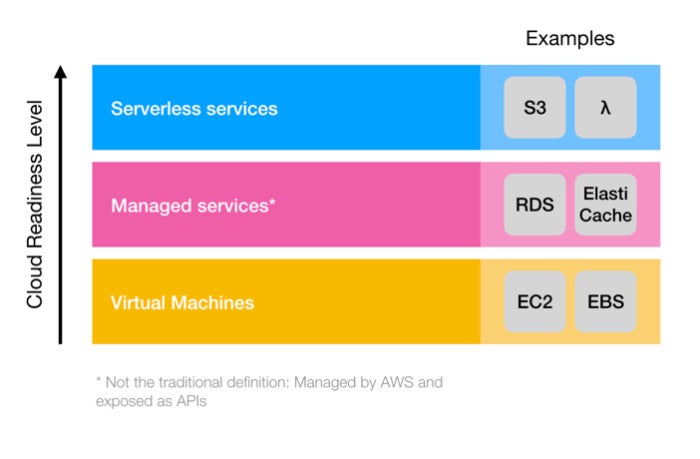
We find it easier to group services by cloud readiness. In this article, we will detail how to use Awless to create and manage cloud resources for a real use case, the deployment of production-ready WordPress instances. We will use the following AWS resources:
- VM services EC2 (Elastic Compute Cloud) and ELB (Elastic Load Balancing);
- High-level services that run in VMs but are managed by AWS, such as RDS (Relational Database Service) or ElastiCache (for queues);
- “Serverless” services that run in multi-tenant VMs, such as S3 (object storage) or Lambda (single function execution).
 Wallix
Cloud readiness levels start with VMs and extend to managed services and serverless services. We will use all layers in this article.
Get started with Awless
Sign up for AWS and create a first account with AdministratorAccess rights. Carefully note your access key and secret key.
Install Awless
Awless is available at GitHub. We provide pre-built binaries and Homebrew packages for MacOS:
>brew tap wallix/awless>brew install awless
You can check that Awless is properly installed by running:
>awless versionAwless is modeled after popular command-line tools such as Git. Most commands are in the form of:
>awless verb [entity] [parameter=value ...]This article will give a 360-degree overview of real production workloads on AWS, starting from scratch. For clarity, we omit all confirmation and some output steps, as Awless always asks to confirm commands that create, update, or delete resources.
First steps with Awless
We can issue our first Awless command by listing our Virtual Private Clouds (VPCs). Because this is our first run, we will need to input some necessary data to configure Awless:
>awless list vpcs
Welcome to awless! Resolving environment data...

Please choose an AWS region:
ap-northeast-1, ap-northeast-2, ap-south-1, ap-southeast-1, ap-southeast-2, ca-central-1, cn-north-1, eu-central-1, eu-west-1, eu-west-2, sa-east-1, us-east-1, us-east-2, us-gov-west-1, us-west-1, us-west-2
Value ? > us-west-2

Syncing region ‘us-west-2’...

Cannot resolve AWS credentials (AWS_ACCESS_KEY_ID and AWS_SECRET_ACCESS_KEY) Please enter access keys and choose a profile name (stored at /Users/john/.aws/credentials):
AWS Access Key ID? AKIAIINZQI7WIEXAMPLE
AWS Secret Access Key? hYWZBVOusePEPSr5PkscplskB84fjbgUEXAMPLE
Choose a profile name? admin
✓ /Users/john/.aws/credentials created
✓ Credentials for profile ‘admin’ stored successfully

All done. Enjoy!

You can review and configure awless with `awless config`.

Now running: awless list vpcs
|     ID ▲     | NAME | DEFAULT |   STATE   |     CIDR      |
|--------------|------|---------|-----------|---------------|
| vpc-1d1df679 |      | true    | available | 172.31.0.0/16 |
Create an AWS user
We will now use Awless to create a new AWS user and give him sufficient rights using the admin profile. We create the user John and his access key:
>awless create user name=john>awless create accesskey user=john aws_access_key_id = AKIAIOSFODNN7EXAMPLEaws_secret_access_key=wJalrXUtnFEMI/K7MDENG/bPxRfiCYEXAMPLEKEYDo you want to save in your .aws/credentials? (y/n) yEntry name in .aws/credentials? [default] john
Now that John exists, he needs a set of permissions. We will give John full access to the EC2, RDS, Auto Scaling, CloudFront, and S3 services that we will use in this article:
>awless attach policy service=ec2 access=full user=john>awless attach policy service=rds access=full user=john>awless attach policy service=s3 access=full user=john>awless attach policy service=autoscaling access=full user=john>awless attach policy service=cloudfront access=full user=john
Now that John is a fully functional user, we’ll switch to his profile for the next steps:
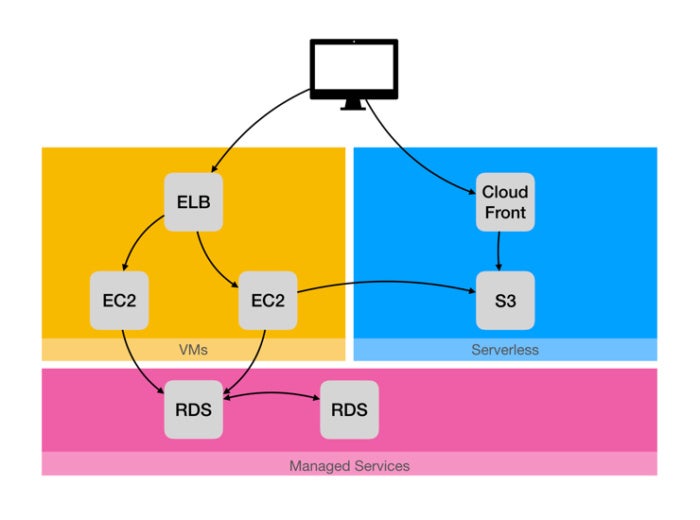
>awless config set aws.profile johnWe will use AWS to set up a highly available, managed WordPress deployment, combining VMs, managed, and serverless services. Our main goal is pictured below. We will have to address three “devops challenges” to reach it, making use of AWS infrastructure services, managed services, and serverless services, respectively.
 Wallix
We will deploy a production WordPress blogging application that relies on managed services and serverless improvements.
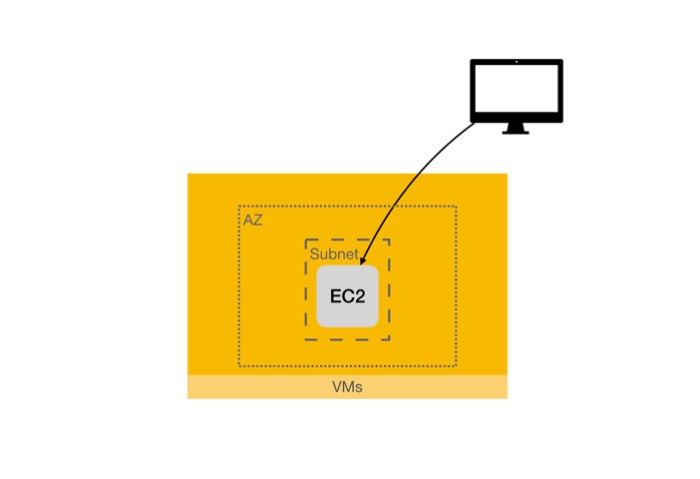
Challenge 1: Lift and shift an application to EC2
Lift and shift is the quickest to migrate legacy applications to the cloud and benefit from the flexibility and cost advantages of cloud platforms. In this case, we will start by deploying a WordPress engine and its database in a single VM. Clients will connect directly to the VM.
 Wallix
The first step is deploying our blog application in a single EC2 instance.
Create a VPC
Before we proceed with the VM creation, we first need to create network resources:
- A private network (or VPC)
- An Internet gateway for this VPC
- A subnet using the Internet gateway
Awless will prompt for any missing parameters with autocompletion. Here we use a mix of both provided (param=value) and prompted parameters:
>awless create vpc cidr=10.0.0.0/16 name=wordpress-vpc>awless create internetgateway[OK] id=igw-1234567>awless attach internetgatewayPlease specify (Ctrl+C to quit, Tab for completion):internetgateway.id? [Tab]internetgateway.id? igw-1234567internetgateway.vpc? @wo[Tab]internetgateway.vpc? @wordpress-vpc
Awless puts forward the best practice to use names rather than resource IDs. As such, @resource-name is the identifier of the resource named “resource-name.”
Let’s create a public subnet to host our WordPress instance, and attach a route table that routes the Internet traffic to the VPC’s Internet gateway:
>awless create subnet cidr=10.0.0.0/24 vpc=@wordpress-vpc name=wordpress-public-subnet>awless update subnet id=@wordpress-public-subnet public=true>awless create routetable vpc=@wordpress-vpc>awless attach routetable subnet=@wordpress-public-subnetPlease specify (Ctrl+C to quit, Tab for completion):routetable.id?[tab]*select the ID of the routetable you created above*>awless create route cidr=0.0.0.0/0Please specify (Ctrl+C to quit, Tab for completion):route.gateway? *the ID of the internet gateway you attached to the VPC above*route.table? *the ID of the routetable you created above*
Note that each action in Awless is about as simple as it can get. Although we follow a comprehensive step-by-step approach, Awless allows us to get through the tedious process of setting up an infrastructure much faster than with the graphical console or the AWS CLI.
Create an SSH keypair and a security group
The cloud network is now ready. Before creating the instance, we need an SSH key pair, to connect to the instance later. In a single command, Awless generates an SSH key pair locally and registers it on AWS:
>awless create keypair name=johnkeyA best practice is to give minimal access to any resource, so we will only accept HTTP connections from all the Internet and SSH from our outgoing IP address. To do that, we create and configure a security group:
>awless create securitygroup vpc=@wordpress-vpc description=\”HTTP public + SSH access\” name=wordpress-secgroup>MY_IP=$(awless whoami —ip-only)>awless update securitygroup id=@wordpress-secgroup inbound=authorize cidr=$MY_IP/32 portrange=22>awless update securitygroup id=@wordpress-secgroup inbound=authorize cidr=0.0.0.0/0 portrange=80
Provision the application with AWS user data
We will now provision our WordPress instance through AWS user data. Here we will use the script available on GitHub:
>awless create instance subnet=@wordpress-public-subnet keypair=johnkey name=wordpress-instance userdata=https://raw.githubusercontent.com/zn3zman/AWS-WordPress-Creation/16a52aef4f618d558d61197df4e4eca4c015277f/WP-Setup.sh securitygroup=@wordpress-secgroupYou can use awless show to get information about any resource, such as the public IP address of our WordPress instance:
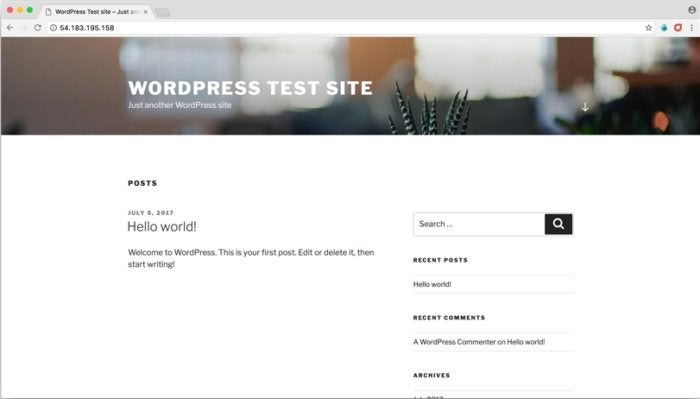
>awless show wordpress-instanceYou can connect to the IP address from the command output to access your WordPress service (though you might have to wait a few minutes for the instance to be provisioned properly).
 WordPress Foundation
Our initial launch of WordPress.
By default, Awless will create a type t2.micro (1 vCPU, 1GB RAM) using Amazon Linux. You can update default values by using awless config set:
>awless config set instance.type m4.large>UBUNTU_AMI=$(awless search images canonical:ubuntu —id-only —silent)>awless config set instance.image $UBUNTU_AMI
To this point, we have built several resources. Using awless list, we can list users, instances, subnets, and all other types of resources (provided your AWS profile has sufficient rights of course). For example, we can list instances:
>awless list instances| ID ▲ | ZONE | NAME | UPTIME ||-------------------|----------|--------------------|---------||i-00268db26b0d0393c|us-west-1c| wordpress-instance | 57 mins |[...]
Awless provides a powerful feature that enables easy connections to instances with SSH. Behind the scenes, Awless will automatically get the instance IP address, guess the username, and connect with the keypair we created earlier:
>awless ssh wordpress-instanceIf you want to delete the WordPress instance, you can run awless delete instance id=@wordpress-instance. You can do it now, as we will create a more advanced deployment in the next challenge.
How to use Awless templates
All the steps in this challenge can be described as a sequence of Awless commands, where the results of previous commands (for instance, the ID of the Internet gateway) are used as inputs to subsequent commands. Because Awless provides a built-in templating system, you could encapsulate all of Challenge 1 in a template and run it with:
>awless run https://raw.githubusercontent.com/wallix/awless-templates/bcd0dd41b1524eeac1e53d12b2998bc56689c517/simple_wordpress_infra.awsAwless offers a powerful feature that enables you to revert most changes applied to an AWS infrastructure. For instance, you can delete the whole infrastructure created by a template in a single command: awless revert revert-id. To find a given revert-id, awless log lists all of the commands previously applied to the cloud infrastructure, with both their output and their ID:
>awless log # find the ID to revert >awless revert 01BM6D1YRZ5SSN5Z09VEEGN0HVChallenge 2: Use AWS managed services
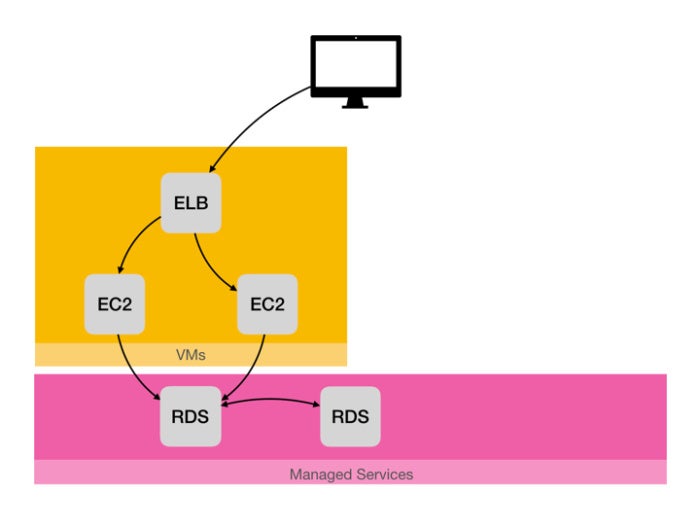
Our previous deployment is functional, but pretty artisanal. Our blog is powered by a single instance in a single Availability Zone (AZ). We now want to build a highly available blog, with a load balancer, two instances in different AZs, and a replicated database that is shared by our instances. Instead of running our own database in an instance, we will use AWS RDS, Amazon’s managed service for SQL databases. Using a managed service provides many advantages including clustering, managed security, and backups.
 Wallix
Our goal for Challenge 2 is to set up a highly available infrastructure with a managed and replicated database.
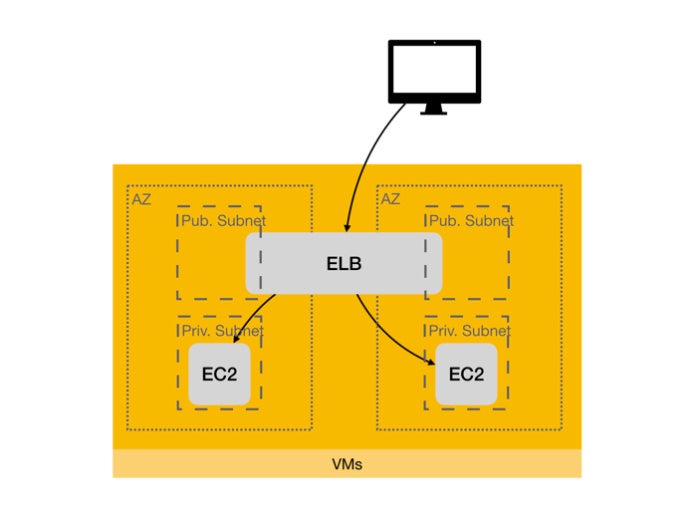
In order to have highly available resources, we need to distribute them in subnets in different availability zones (AZs) and balance the load through Elastic Load Balancing.
 Wallix
We want our WordPress instances to be able to fail gracefully (one at a time).
For this challenge, we will create the following:
- One load balancer to distribute the load between the instances
- Two public subnets to associate with the Internet-facing load balancer
- Two private subnets in different AZs (e.g. us-east-1a, us-east-1e) to host the instances
- One auto scaling group to manage the scaling of WordPress instances
- One NAT gateway in one public subnet to enable outbound calls for instances provisioning
- One public fixed IP (Elastic IP) for the NAT gateway
- One RDS for MariaDB instance automatically replicated in the private subnets
We will build this infrastructure by running Awless templates. The first template creates subnets and routing. The {hole} notation allows parameters to be filled dynamically during the running of the template. The $reference notation enables back references of created resources.