


Azure Functions is the serverless compute offering in the Microsoft Azure cloud. Essentially, “serverless” means you don’t even need a virtual machine to run an Azure Function. Azure Functions are just an implementation of platform as a service (PaaS), one that is based on an event-driven programming model. This article presents an introduction to Azure Functions, why they are useful, and how we can work with them.
As there are no servers that you have to manage, Azure Functions can scale automatically, and you pay only for the time your code runs. You can leverage Azure Functions for event processing in real time, or for scheduled data processing jobs, such as scheduled data backup or data clean-up. You can even use Azure Functions as serverless back ends to mobile applications.
Here’s a quick glance at some of the striking features of Azure Functions:
- Flexible code deployment (through Azure Portal or GitHub, for example)
- Support for multiple languages (C#, F#, Java, Node.js, or PHP)
- Support for external dependencies via NuGet or NPM
- Easy integrations with other Azure services
To work with the code examples provided in this article, you should have Visual Studio 2022 installed in your system. If you don’t already have a copy, you can download Visual Studio 2022 here.
You should also have the most recent version of Azure Function Tools and an active Azure Subscription. Azure Function Tools are included as part of the Azure development workload in Visual Studio 2022.
What are Azure Functions? Why do we need them?
Azure Functions are hosted services on the Microsoft Azure cloud that execute code on demand, without requiring the provisioning or management of infrastructure. You write only the code you need for the task at hand, and Azure Functions handles everything else.
An Azure Function can be triggered by an event (an HTTP request) or on a schedule (using a CRON expression). You can quickly test functions locally as you write your functions before deploying them to Azure.
Benefits and drawbacks of Azure Functions
Reduced costs: One of the most compelling reasons for using Azure Functions is that it dramatically reduces the cost of running applications. You only have to pay for the resources you have consumed, and no resources are consumed until your function executes.
Flexibility: You can create and deploy new event-driven functions quickly as your requirements change, and you can modify existing functions as well.
Scalability: Azure Functions provides scalability by enabling you to quickly spin up new instances of a function when demand increases. This eliminates the need for manually scaling instances up and down in advance, a process that, if demand spikes unpredictably or infrequently, becomes laborious and can also prove inefficient.
Triggers and bindings in Azure Functions
Azure Functions use triggers and, optionally, bindings. Triggers are user-defined functions that specify how an Azure Function will be executed. A trigger can be defined by a code attribute and triggered by a queue message, a timer, an HTTP request, a blob, etc.
Triggers have input bindings that define the data available to the code during execution. The HTTP request body is typically passed as a JSON object to the Azure Function’s input parameter in an HTTP trigger.
Binding is a way to connect resources to an Azure Function declaratively. There are two types of bindings: input and output. While the former allows data to be input into the Azure Function, the latter allows the Azure Function to send data to external resources. You can have only one trigger for an Azure Function but multiple bindings.
Types of triggers in Azure Functions
The different types of triggers in Azure Functions make it possible for you to set up a function that runs when an update to a resource takes place, such as an event hub trigger that sends an email alert every time your service is updated.
HTTP trigger: An HTTP trigger uses an HTTP endpoint to call the function via an HTTP request. You can use HTTP triggers to create a serverless web application to receive webhooks from other services.
Timer trigger: A Timer trigger is called on a pre-defined schedule. This schedule can be expressed either in CRON syntax or using intervals. The Timer trigger is helpful for scheduling any regular job, such as a clean-up task or a weekly email report.
Event Hubs trigger: An Event Hubs trigger responds to an Event Hubs stream message. When using the EventHubTrigger attribute, you can bind to the stream of messages from all partitions.
Blob Storage trigger: A Blob trigger responds to events in Azure Blob Storage. A Blob trigger can start an Azure Function whenever a new Blob is created or an existing Blob is updated.
Cosmos DB trigger: A Cosmos DB trigger responds to events generated by Azure Cosmos DB. For example, if you want your Azure Function to be executed when a new document is created in the database, you can create a Cosmos DB trigger and add the necessary code to handle the event.
Event Grid trigger: An Event Grid trigger responds to Azure Event Grid events. Event Grid is a serverless event routing service that allows you to create rules that route events from Azure services such as Blob storage, resource groups, and third-party resources, to any destination supported by Event Grid.
Queue Storage trigger: An Azure Queue Storage trigger fires when messages are added to Azure Queue Storage. Azure Queue Storage provides reliable, asynchronous messaging between application components.
Generic webhook: A webhook is analogous to a user-defined HTTP callback. It provides a lightweight way to be notified by another service when some even occurs. A generic webhook is yet another category of trigger that is fired when an HTTP request originates from a service.
GitHub webhook: A GitHub webhook trigger is executed when an event occurs in your GitHub repository, such as a new branch is created, an existing branch is deleted, or code is committed or commented.
Service Bus trigger: A Service Bus trigger responds to messages from an Azure Service Bus queue or topic.
Create an Azure Functions application project in Visual Studio
First off, let’s create a .NET Azure Functions application project in Visual Studio. Assuming Visual Studio 2022 is installed in your system, follow the steps outlined below to create an Azure Functions project.
- Launch the Visual Studio IDE.
- Click on “Create new project.”
- In the “Create new project” window, select “Azure Functions” from the list of templates displayed.
- Click Next.
- In the “Configure your new project” window shown next, specify the name and location for the new project.
- Click Create.
- In the “Create a new Azure Functions application” screen, select the type of trigger you would like to use for your Azure Function.
- Click Create.
You should now have a new .NET Azure Functions application project ready to go in Visual Studio 2022. We’ll use this project in the subsequent sections of this article.
Create a new Azure Function
By default, an Azure Function named Function1 will be created automatically inside a file named Function1.cs. Let’s replace the default function with the following code:
using System;
using System.IO;
using System.Threading.Tasks;
using Microsoft.AspNetCore.Mvc;
using Microsoft.Azure.WebJobs;
using Microsoft.Azure.WebJobs.Extensions.Http;
using Microsoft.AspNetCore.Http;
using Microsoft.Extensions.Logging;
using Newtonsoft.Json;
namespace Azure_FunctionAppDemo
{
    public static class Demo
    {
        [FunctionName("Demo")]
        public static async Task<IActionResult> Run(
          [HttpTrigger(AuthorizationLevel.Function, "get",
          "post", Route = null)] HttpRequest request,
            ILogger logger)
        {
            logger.LogInformation("An HTTP triggered Azure Function.");
            string requestBody = String.Empty;
            using (StreamReader streamReader = new StreamReader(request.Body))
            {
                requestBody = await streamReader.ReadToEndAsync();
            }
            return new OkObjectResult(!string.IsNullOrEmpty(requestBody));
        }
    }
Refer to the code listing above. An Azure Function is represented by a static class having a static function called Run. In this example, the name of the Azure Function is Demo. The FunctionName attribute is used to indicate that the function is an Azure Function. Moreover, it marks the Run method as the entry point. The function name must be unique within a project.
The two parameters of the Run method are of type HttpRequest and ILogger. The first parameter enables you to work with the HttpRequest object (to retrieve request metadata, for example). The second parameter enables you to log data pertaining to your Azure Function to a pre-defined log target.
We know that Azure Functions are executed based on pre-configured triggers. The usage of the HttpTrigger attribute indicates that the Azure Function named Demo will be based on an Http trigger. Figure 1 below shows how you can select the trigger for your function when you create your Azure Functions application in Visual Studio.
 IDG
IDG
Figure 1. When you create a new Azure Functions application in Visual Studio, you select the type of trigger you want to use for your Azure Function.
Test an Azure Function locally
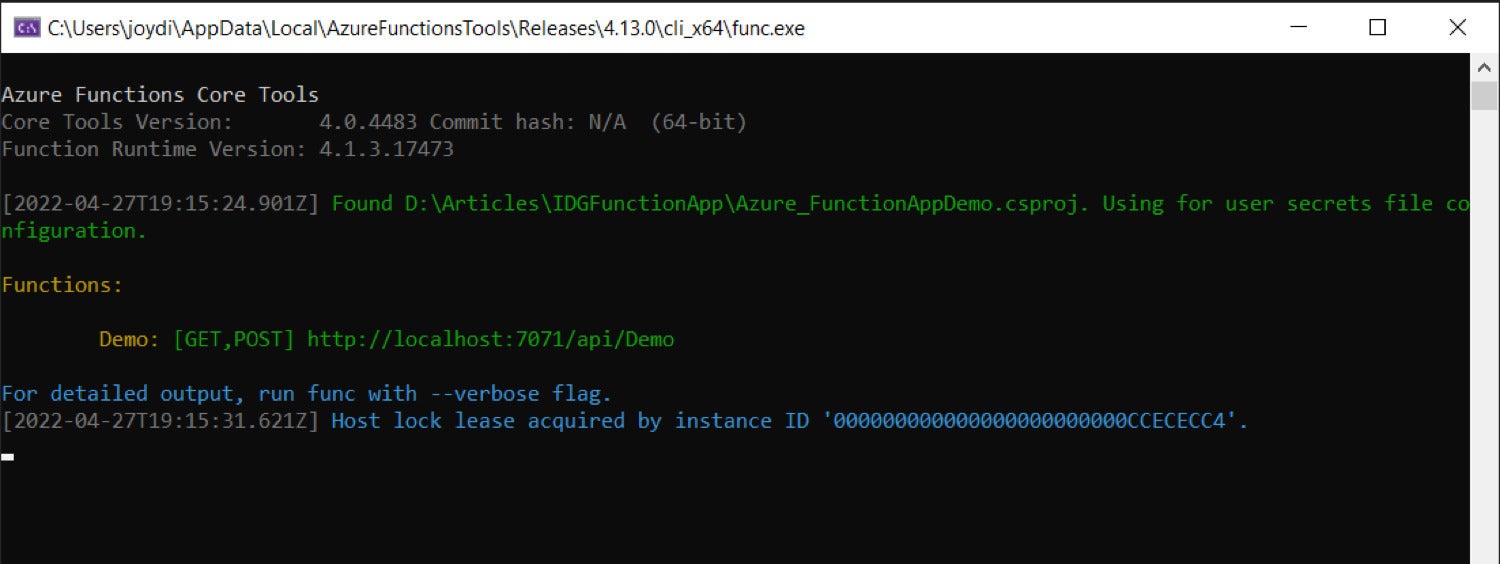
Now that your Azure Function is ready, the next step is to run it. You can use Azure Functions Tools to execute Azure Functions locally in your system. You can just press F5 to execute and test your Azure Function. Note that if Azure Functions Tools is not installed, you will be prompted to install it when you try to run your function. Just accept the request to download and install the tools when prompted.
If Azure Functions Tools are installed, the console window will display the URL of your Azure Function as shown in Figure 2 below.
 IDG
IDG
Figure 2. Azure Functions Tools outputs the URL of HTTP-triggered functions.
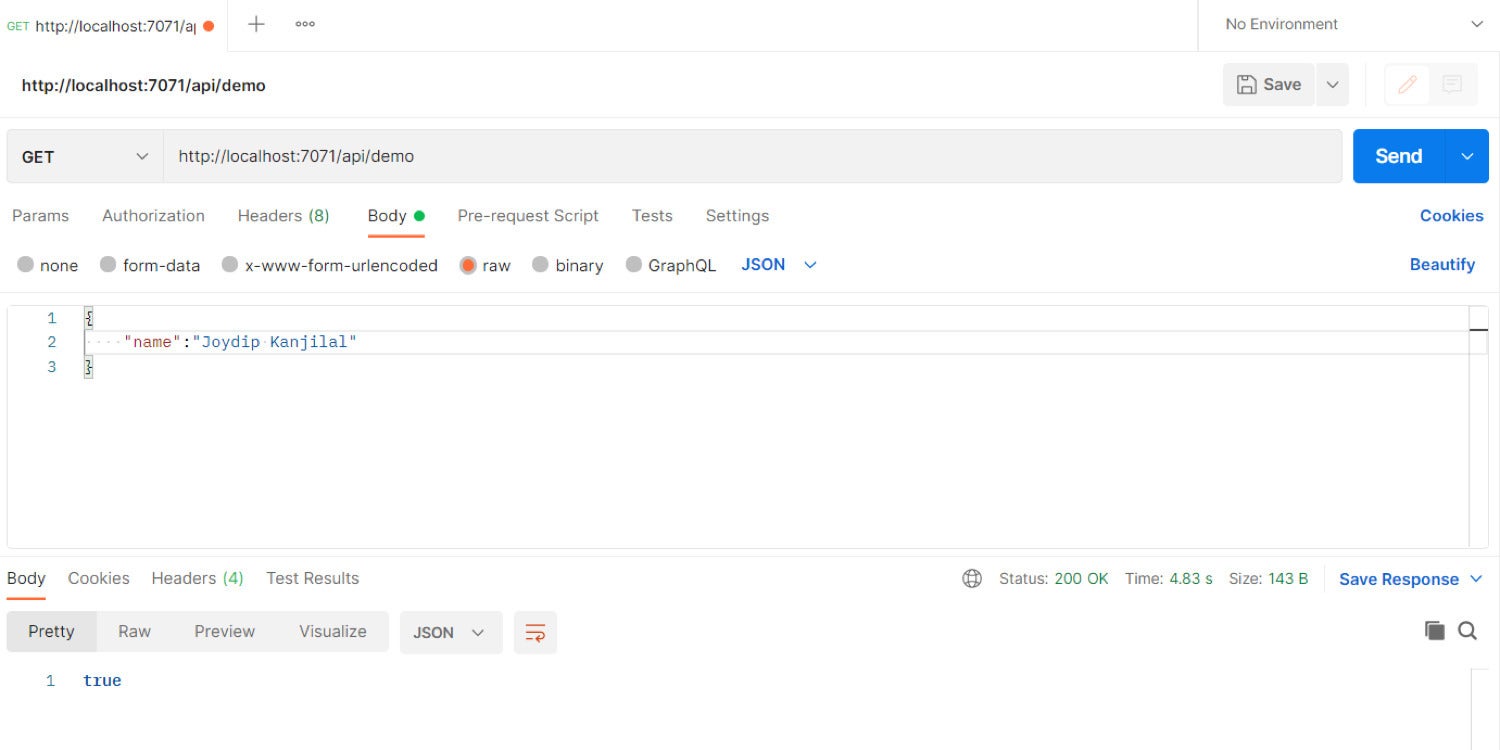
Make a note of the URL displayed for your Azure Function. We’ll now take advantage of Postman, one of the most popular API testing tools, to test the function. When you execute the URL in Postman, you should see output similar to that displayed in Figure 3 below.
 IDG
IDG
Figure 3: The Azure Function in action!
Publish an Azure Function to Azure
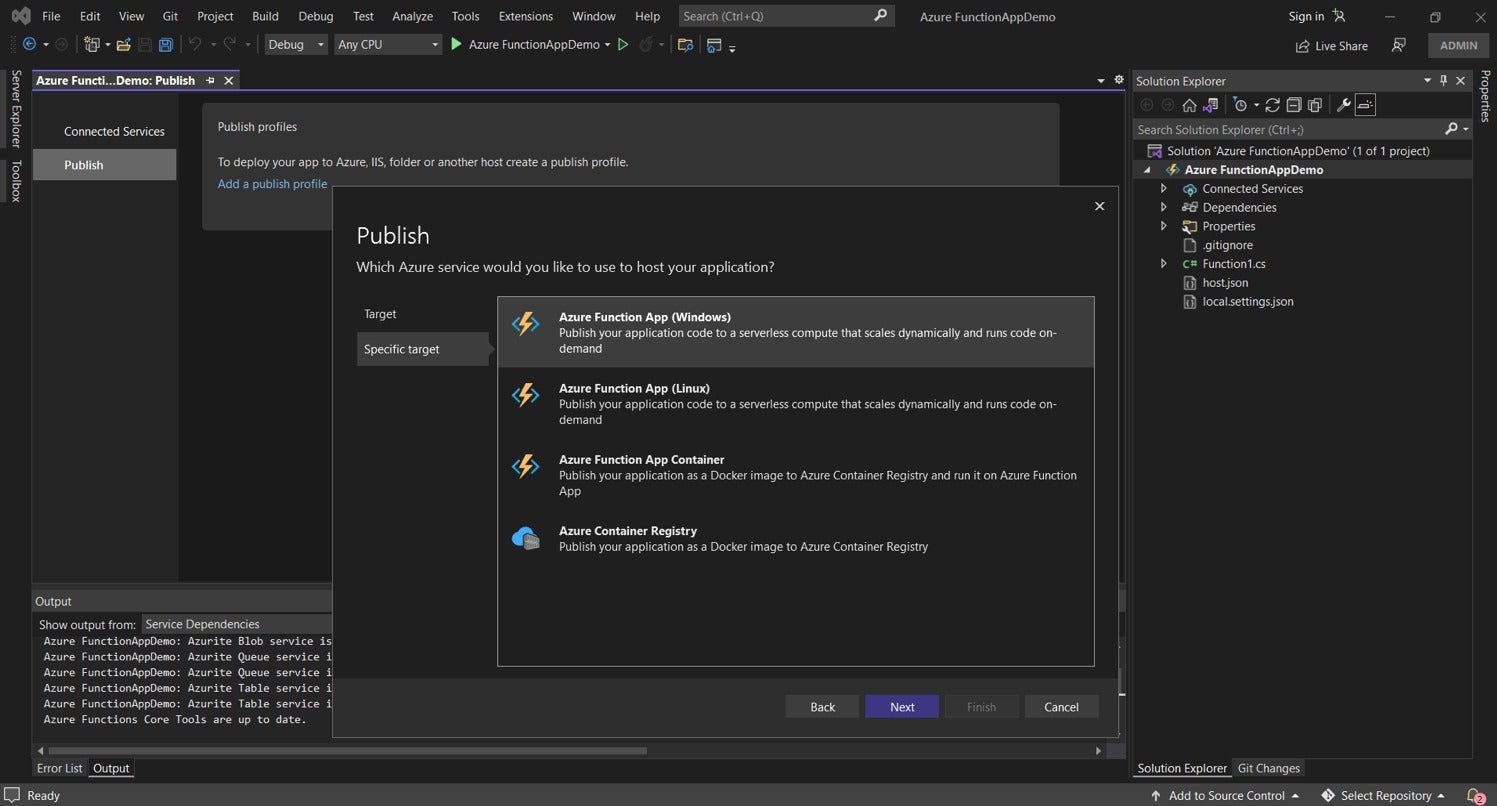
Assuming that you’re logged in to Azure, follow the steps outlined below to publish the Azure Functions application project to Azure:
- Right-click on the Azure Functions application project in the Solution Explorer window.
- Click Publish.
- Select Azure as the publish target.
- Select Azure Function App (Windows) as the specific target.
- Click Next.
- Finally, click Finish to complete the process.
 IDG
IDG
Figure 4. You can publish your Azure Functions application to Microsoft Azure directly from Visual Studio. Just make sure you’re logged in to Azure.
You can take advantage of Azure Functions to implement serverless compute functions in Azure. The ability to run in a serverless environment makes Azure Functions highly scalable and efficient. Azure Functions are well-suited for scheduled tasks, notifications, and lightweight APIs—any simple task that can be executed whenever a specified event occurs.
Azure Functions can be invoked by an HTTP request, as shown here, or by a webhook, or by an event in Azure Cosmos DB, Blob Storage, Mobile Apps, and many other Azure services. You can even trigger an Azure Function from OneDrive, Excel, or Outlook. And you can store the data processed by Azure Functions in an Azure storage service, a document database, or even a SQL database if you want to.
Finally, note that you can use Azure Durable Functions, an extension of Azure Functions, to build durable, stateful functions that run in the Azure cloud. We’ll take a look at working with Azure Durable Functions in a later post here.